Key Takeaways
Installing a swim ladder improves dock safety and accessibility during swimming season.
Proper ladder placement ensures stability and prevents structural stress.
PolyDock systems have designated attachment areas for secure mounting.
Using manufacturer-approved hardware protects your warranty and dock integrity.
A correctly installed ladder enhances both safety and resale value.
Why a Swim Ladder Is a Must-Have Dock Accessory
A swim ladder is considered one of the most essential dock accessories because it transforms a simple platform into a safe recreational hub. It provides a secure, reliable way to enter and exit the water, especially for children, older adults, or anyone who might struggle to climb onto a dock without assistance. It also protects the dock itself, reducing wear and tear caused by people pulling themselves up on edges or cleats.
Perhaps more importantly, a ladder enhances the overall enjoyment of your waterfront. Whether it’s for swimming, kayaking, or simply cooling off on a hot day, having a dedicated access point makes the water feel more accessible and inviting. It’s a small investment that provides a better experience for everyone who spends time on the dock.
Picking the Right Ladder for Your Setup
Most dock manufacturers offer accessories specifically designed for their proprietary systems. If you’re looking to add a swim ladder to your setup, the optimal choice is always a ladder from your dock manufacturer.
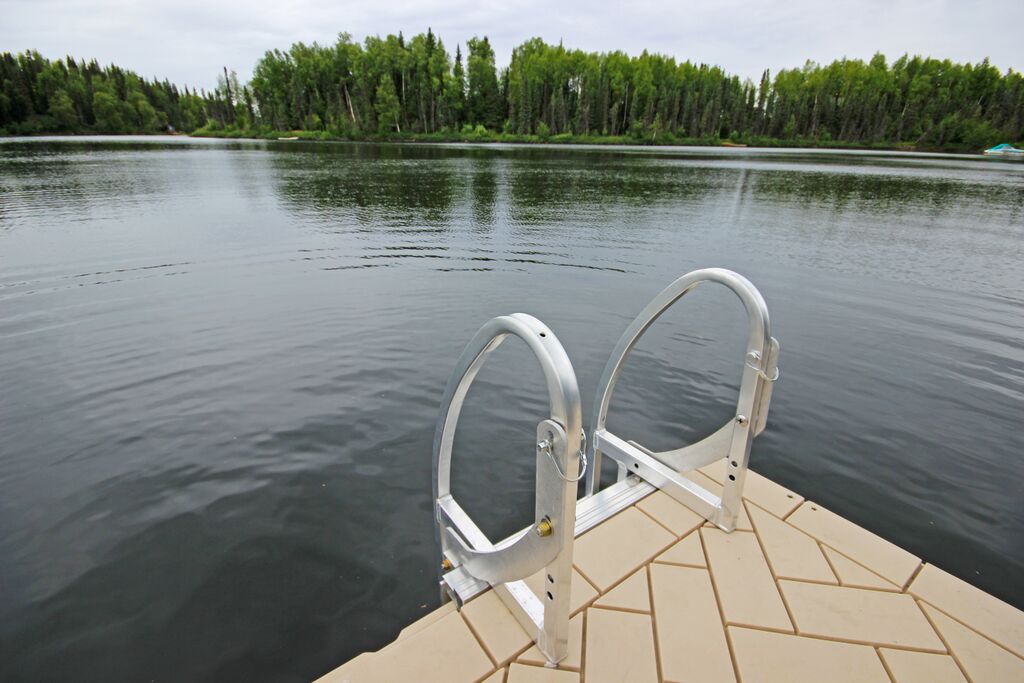
At PolyDock, we offer Pivoting Dock Ladders in 3-, 4-, or 5-step configurations to accommodate varying water depths. They feature a lightweight aluminum construction, a vertical pivoting action, and a locking pin that allows you to flip it up when not in use, easy-to-grip looped handrails, and slip-resistant tread textures.
And, like all PolyDock accessories, the Pivoting Dock Ladders use our innovative track system, allowing owners to easily install them anywhere along the dock perimeter.
Where to Install a Dock Ladder for Best Safety and Convenience
The optimal location for swim ladders is in a low-traffic area with consistent water depth. Avoid areas near mooring points or where watercraft frequently dock. Look for a spot with a clear surface (away from gear, equipment, and other potential tripping hazards), so people have a wide, unobstructed space to stand once they’ve climbed out.
Convenience is equally important. The best spot is one that naturally complements how you use your dock—near a designated swim area, close to a kayak launch, or at the end of a platform where friends and family gather.
Identify Safe Attachment Points on a PolyDock
Each PolyDock section is reinforced with kiss-offs—internal supports where the bottom meets the top of the structure—so the surface remains rigid and stable underfoot (Brinson Marine, 2023). This design feature ensures that wherever you attach a ladder, the dock can handle the load.
If your water depth fluctuates, installing the ladder at the deepest accessible point helps prevent the bottom rungs from hitting the lakebed during low water levels. Avoid areas where anchoring components, brackets, or cables are located, as these can compromise dock safety.
Tools, Hardware, and Prep Checklist
Tools You’ll Need:
9/16" Wrench or Socket
7/16" Wrench or Socket
Nut Driver
Large Flat-Head (Slotted) Screwdriver
Anti-Seize Lubricant
Hardware Checklist:
Ladder Pivot Bracket (2)
Ladder Frame (Left and Right)
Ladder Step (3)
Ladder Pivot Angle (2)
Bolt Bag (1)
Nut 1/4 (12)
Bolt Carriage 1/4 x 3/4 (12)
Pin Snap 3/8 x 1.75 (2)
Bolt Slotted Round 3/8 x 2.0 (2)
Washer Flat 3/8 (4)
Plastic Spacer (2)
Nut Nyloc 3/8-16 Brass (2)
PolyDock Accessory Bracket (sold separately)
* The hardware list above is for a 3-step ladder.
Pile Hoop Bracket Top Connector (1)
PolyDock Connector Bottom (1)
Weldment QC Poly Dock Ladder Connector Left (1)
Weldment QC Poly Dock Ladder Connector Right (1)
Bolt Bag QC Poly Dock Ladder Connector (1)
Poly Connector Rod 13.875 with hardware (2)
Washer Rectangular SS 1/8 x 2 x 3/4 (1)
Washer Lock 5/16 SS (1)
Bolt Hex 5/16-18 x 4.5 Full Thread SS 304 (1)
Screw Oval #12 x 1.0 SS (1)
Bolt Carriage 3/8-16 x 1.0 SS 304 (4)
Nut Flange 3/8-16 Brass (4)
* The hardware list above is for the PolyDock Ladder Connector (Part# 1006674).
Prep Checklist:
Confirm accessory connector availability: This is sold separately and required to attach the ladder to PolyDock’s track system.
Clean the track: Clear any debris, such as sand or algae, from the PolyDock perimeter track.
Pre-assemble handrails: It’s easier to attach the handrails to the ladder steps on a flat surface before mounting the entire unit to the dock edge.
It’s also wise to take a few moments to prepare the dock surface. Clear the surrounding area of gear, ropes, or accessories to create a safe workspace. If possible, perform the installation while the dock surface is dry and stable, and consider having a second person nearby to help hold the ladder in position during alignment and mounting.
Step-by-Step Ladder Installation on a PolyDock
Pivoting Dock Ladder Assembly:
Step 1: Attach each Ladder Pivot Angle to one Ladder Pivot Bracket and one Accessory Bracket. Secure to each with two 3/8 x 1.0 Carriage Bolts and two 3/8 Flange Nuts (included with PolyDock Ladder Connector).
Step 2: Attach each Ladder Step to the Ladder Frames (Left and Right). Secure to the Ladder Frame with two 1/4 Carriage Bolts and two 1/4 Hex Nuts.
Step 3: Attach each Ladder Frame (Left and Right) to one Ladder Pivot Bracket. Secure with one 3/8 x 2.0 Round Slotted Bolt, two Poly Spacers, two 3/8 Flat Washers, and one 3/8 Nyloc Nut.
Pivoting Dock Ladder Installation:
Step 1: Insert connecting rods into the ladder bottom connector and secure with an oval screw.
Step 2: Insert a 4-1/2 full thread bolt through the lock washer, rectangular washer, and top connector, and thread into the connecting rods about 1/2".
Step 3: Attach the ladder assembly to QC Weldment PolyDock Ladder Connectors using 3/8 x 1 carriage bolts and 3/8 flange nuts.
Step 4: Set the previously assembled bracket into the desired position and slide the Weldment QC Poly Dock Ladder Connectors into the slot in the ladder bottom connector. Tighten 5/16 x 4-1/2 full thread bolts to 20 ft/lbs.
Looking to upgrade your dock? Check out these floating dock installation instructions to see how easy it is to transform your waterfront experience with PolyDock.
Post-Installation Safety Checks (Do This Before Anyone Uses It)
Start with a shake test to confirm the ladder doesn’t wobble or shift under load. Any movement usually indicates that the composite connector plates in the perimeter track need to be further tightened. Next, verify the pivot action by lifting the ladder into the storage position and back down again to ensure the motion is fluid.
Finally, run your hand along the aluminum frames and handrails to confirm there are no sharp edges or exposed bolt threads that could cause injury and ensure the bottom step sits at a safe depth (typically at least 2 feet below the waterline) to allow for easy mounting without the risk of hitting the lake bed.
Maintenance Tips to Keep Your Dock Ladder Safe All Season
During the height of summer, perform quick weekly checks to ensure all hardware remains tight and the traction on the steps is clear of slippery grime. When necessary, clean the ladder with a soft brush and fresh water to remove marine growth. After extreme weather events or a weekend of heavy use, inspect the hardware for any loosening or wear.
Always pivot the ladder out of the water when not in use to prevent algae buildup and marine growth. If you won’t be using the dock for extended periods, store the ladder in a dry location to mitigate corrosion and wear. We recommend applying a dab of marine-grade anti-seize to the threads before reassembly to prevent stainless steel hardware from galling and locking up (Science Insights, 2026).
Common Mistakes to Avoid When Installing a Dock Ladder
One of the most frequent errors is poor placement. Mounting a ladder too close to a corner or in the path of boat traffic creates unnecessary risks for swimmers and boaters alike. Even with an easy-to-use system like PolyDock, small installation errors can lead to premature wear or safety issues.
Common pitfalls include:
Using Incorrect Fasteners: Always use the stainless steel carriage bolts and hex nuts specified in the manual to ensure structural integrity.
Skipping Washers or Spacers: Omitting critical components, such as poly spacers or 3/8 flat washers, can lead to excessive play in the pivot assembly and hardware failure.
Neglecting the Break-In Period: Hardware can settle after the first few days of activity. Failing to re-tighten bolts after the first week of use is a common cause of ladder wobble.
Finally, ensure the safety snap pin is fully engaged to lock the unit in the down position before allowing anyone to use the ladder.
When to Call a Dealer or Pro Installer
While PolyDock is designed for easy DIY customization, certain scenarios benefit from professional expertise to ensure the highest standards of safety and performance. If you’re managing a large-scale dock system, commercial marina, or high-use waterfront, a professional installer can ensure your dock accessories for sale are optimized for heavy traffic and long-term durability.
If you’re unsure about accessory compatibility, shopping for swim ladders, or are looking for floating docks for sale, enter your zip code in the dealer locator tool below. This will give you a list of authorized PolyDock dealers along with their contact information and driving directions.
FAQs
Can I install a swim ladder on any floating dock?
While most floating docks can accommodate universal swim ladders, the safest option will always be one that’s specifically designed for your dock system. Manufacturer‑engineered ladders ensure proper fit, secure attachment, and long‑term reliability. Using a compatible accessory also prevents damage to the dock and makes installation much easier.
Where should a dock ladder be mounted for safety?
A dock ladder should be mounted in a low-traffic area away from boat slips, personal watercraft lifts, and other equipment. Choose a spot with consistent water depth free of underwater hazards like rocks or stumps.
Do I need special hardware for PolyDock ladder installation?
Yes. PolyDock Pivoting Dock Ladders require the PolyDock Ladder Connector, which includes the hardware needed to mount the ladder securely to the track system.
How deep should a swim ladder extend below the water?
A ladder should extend far enough below the surface that the bottom rung sits at a comfortable depth for climbing, typically 2–3 steps submerged. This allows swimmers to easily place their feet and pull themselves up without straining.
Always check seasonal water fluctuations to ensure the rungs don’t hit the lake bed during low water levels.
Should dock ladders be removed during winter?
Yes. Removing the ladder during winter protects it from ice damage, corrosion, and unnecessary wear. Pivoting the ladder out of the water after each use helps during the season, but full removal and dry storage are recommended when the dock won’t be in use for extended periods.
References:
Brinson Marine (2023). Looking for Floating Dock? Why ShoreMaster PolyDock might be the fit for you!, https://www.youtube.com/watch?si=xDsE93Vm5Uu4POaO&v=1D6s4oPm8zk&feature=youtu.be
Science Insights (March 11, 2026). What Is Metal Galling and How Can You Prevent It?, https://scienceinsights.org/what-is-metal-galling-and-how-can-you-prevent-it/


